All Haynes Digital Online Manuals are currently 50% off. They feature everything you love about our books in an instantly accessible digital online form, that you can use via any device with an internet connection.
This page is taken directly from our digital online manual 42026 for the 2001-2011 Honda Civic and 2002-2011 Honda CR-V with 1.7L, 1.8L, 2.0L or 2.4L engines. We recommend you check the belts every 30,000 miles or 2 years, whichever comes first, and adjust the tension on the 1.7L if needed. The other engine use spring loaded automatic tensioners, so no adjustment is needed, just replacement if wear is evident.
Warning: The electric cooling fan(s) on these models can activate at any time the ignition switch is in the ON position. Make sure the ignition is OFF when working in the vicinity of the fan(s).
Drive Belt Check
- The drive belts are located on the passenger side of the engine and play an important role in the operation of the vehicle and its components. Due to their function and material makeup, the belts are prone to failure after a period of time and should be inspected and adjusted (on 1.7L engines) periodically to prevent major damage.
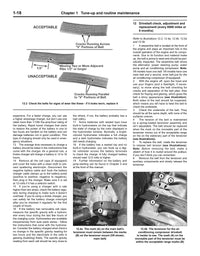
(See illustration) On 1.8L, 2.0L and 2.4L engines, no adjustment is necessary because they are equipped with an automatic drive belt tensioner. If the wear indicator has moved beyond the specified range, replace the drive belt
Details of the automatic drive belt tensioner (1.8L, 2.0L and 2.4L engines) - If the wear indicator has moved beyond the specified range, replace the drive belt.
1) Maximum length (belt worn out) mark
2) Belt stretch indicator (moves with tensioner)

- The number of belts used on a particular vehicle depends on the accessories installed. Drive belts are used to turn the alternator, power steering pump, water pump (all except 1.7L engines), and air conditioning compressor. Depending on the pulley arrangement, more than one of these components may be driven by a single belt.
- With the engine turned off, open the hood and locate the drive belts on the passenger side at the front of the engine. Use a flashlight to carefully check each belt.
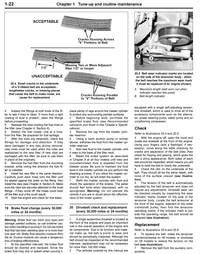
(See illustration) Check for a severed core, separation of the adhesive rubber on both sides of the core and for core separation from the belt side. Inspect the ribs for separation from the adhesive rubber and for cracking or separation of the ribs, torn or worn ribs or cracks in the inner ridges of the ribs. Also check for fraying and glazing, which gives the belt a shiny appearance. Inspect both sides of the belt by twisting the belt to check the underside. Use your fingers to feel the belt where you can’t see it. If any of the above conditions are evident, replace the belt(s).
Here are some of the more common problems associated with drive belts (check the belts very carefully to prevent an untimely breakdown)

- On 1.7L engine models, the tension of each belt is checked by pushing on it at a distance halfway between the pulleys. Apply about 20 pounds of force with your thumb and see how much the belt moves down (deflects).
(See illustration) Measure the deflection with a ruler and compare your results to the deflection limits.Power steering pump New belt 9.0 to 11.0 mm Old belt 13.0 to 16.5 mm
Alternator/AC compressor New belt 5.0 to 6.5 mm Old belt 8.5 to 11.0 mm
Measure the drive belt deflection with a straightedge and ruler - make sure the ruler is perpendicular to the straightedge

Belt Adjustment (1.7L engines)
Power steering pump belt
- (See illustration) Loosen the power steering pump mounting bolt nut and locknut, then turn the adjuster bolt to set the belt tension.
When you have obtained the desired tension, tighten the pump fasteners securely.
1.7L engine Power steering pump mounting and drive belt adjustment bolt details
A) Pump locknut
B) Pump mounting bolt/nut (not visible in this photo)
C) Adjusting bolt

Alternator/air conditioning compressor belt
- Loosen the alternator upper mounting bolt and nut, then loosen the adjuster bracket lock bolt and lower mounting bolt.
(See illustration) Turn the adjuster bolt to set the belt tension. When you have obtained the desired tension, tighten the fasteners securely.
1.7L engine alternator/air conditioning compressor mounting and drive belt adjustment details
A) Adjusting bolt
B) Lock bolt
C) Bracket mounting bolt

Drive Belt Removal and Replacement
1.7L Engine
Power steering pump drive belt
Follow Step 5 above to loosen the drive belt, but slip the belt off the pulleys and remove it.
When installing the belt, make sure the belt is centered on all of the pulleys.
Adjust the drive belt tension as described above in Step 5.
Alternator/air conditioning compressor drive belt
- The power steering pump drive belt must be removed first before you can remove the alternator/AC compressor belt (see Step 5 above).
- Follow Step 6 above to loosen the alternator/AC compressor drive belt, but slip the belt off the pulleys and remove it.
- When installing the belt, make sure the belt is centered on all of the pulleys.
- Adjust the alternator/AC compressor drive belt as described in Step 6 above.
- Reinstall the power steering pump drive belt as described in Step 5 above.
The following video will guide you to changing the two manually adjusted drive belts on the 1.7L engine, which is much more involved than the other engines with automatic tensioners. Text instructions and pictures follow for all other Civic and CR-V engines.
1.8L, 2.0L and 2.4L engines
- If you’re working on a 1.8L, 2.0L or 2.4L engine, apply the parking brake, loosen the right (passenger’s side) front wheel lug nuts, raise the front of the vehicle and support it securely on jack stands. Remove the wheel, then remove the splash shield.
- (See illustration) The automatic tensioner must be rotated to allow drive belt replacement. Place a wrench or a socket on the tensioner pulley bolt and slowly rotate it until the belt can be removed.
Note: The automatic tensioner may rotate away from the belt in the clockwise or counterclockwise direction, depending on design. If it doesn’t move in one direction, try the other. Steady, moderate pressure should rotate it.
Remove the belt and slowly release the tensioner. Install the new belt over most of the pulleys, then rotate the tensioner to allow the belt to slip over it. Release the tensioner slowly until it contacts the drive belt.
Place a wrench or a socket on the drive belt tensioner pulley bolt and rotate it clockwise

- When installing the belt, make sure the belt is centered on the pulleys.
- Install the splash shield, wheel and lug nuts.
Lower the vehicle and tighten the lug nuts to the proper torque:
Wheel lug nuts 80 ft-lbs
Automatic drive belt tensioner replacement (1.8L, 2.0L and 2.4L engines)
- Remove the drive belt (see Steps 15 and 16 above).
1.8L engines
- Remove the alternator (see Chapter 5 of the Haynes manual).
Remove the water pump pulley mounting fasteners (see Chapter 3 of the Haynes manual).
Remove the automatic tensioner fasteners and tensioner assembly.
(See illustration) Install the tensioner and fasteners and tighten to the proper torque:
8mm bolt 17 ft-lbs
10mm bolt 40 ft-lbs
1.8L engine automatic drive belt tensioner mounting bolts
A) 10 mm mounting bolt
B) 8 mm mounting bolt

- Place a wrench or a socket on the tensioner. Slowly rotate and compress the tensioner downwards, then hold it for three seconds. Rotate and push the tensioner slowly upwards and hold for three seconds.
- Repeat this procedure three times to bleed the tensioner assembly.
- The remaining installation is the reverse of removal.
2.0L and 2.4L engines
- If you’re working on a 2.4L engine, remove the power steering pump (see Chapter 10 of the Haynes manual).
- If you’re working on a 2.0L engine, remove the idler pulley mounting bolts, then remove the pulley.
- Unscrew the tensioner pulley bolt, then unscrew the mounting bolts and remove the tensioner.
- Installation is the reverse of removal.
Tighten the mounting bolts to the proper torque:
Tensioner mounting bolts 16 ft-lbs