What Does the Cabin Air Filter Do?
Unlike the engine air filter under the hood, the cabin air filter cleans the air for the driver and passengers inside the car. Also called a pollen filter, it stops particles of dust, pollen and other fine pollutants from entering through the heat and air conditioning ducts. When you switch on the heater, defroster, AC, or even just open the vent, the air passes through the cabin filter before coming into the car. That is healthier for you and helps prevent mold and mildew from getting into the climate control ducts, not to mention bugs.
Not surprisingly, the cabin air filter isn't much different in construction from the one the engine breaths through. The filter can be made from different materials, but most feature cotton or paper fibers folded into a convoluted, pleated shape (for maximum surface area). Some filters also contain carbon to reduce odors from pollution and the surrounding countryside.
How Long Should a Cabin Air Filter Last?
Most manufacturers recommend cabin air filters be swapped for a fresh one every 15K miles, or once a year, whichever comes first. However, if you notice a reduction of air coming through the vents, or a musty smell, replacing the filter is a good idea. The actual filter is inexpensive, and the labor involved in checking it is the same whether you replace it or not.
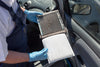
If you do a lot of dusty rural driving it will probably surprise you just how much dirt the filter traps. If you bought your car used without a service history, it's not a bad idea to identify where it's located and check the condition. Unless it's looks clean and fresh, swap it for a new one.
Where Is the Cabin Air Filter?
Cabin filters can be located in the cabin - usually under or behind the glove box, with an access panel - or as part of the cowl below the windshield wipers. You may have to press a tab, and slide the glove box itself out of the way in order to get to it. Your Haynes manual has detailed information on how to find and change it.
Some cars require you to access the filter (or filters) from under the hood by the firewall. If yours is below the windshield, it's very important that you replace any weatherstripping, and close the cover tightly, so the waterproof seal remains intact. Otherwise, you could have water leaking into the car and soaking the carpets, or causing a musty smell.
What Tools Are Needed To Change the Cabin Air Filter?
If you are looking for a simple task to get you started on tinkering with your own car, replacing the cabin air filter is a good place to start. Depending on where your filter is installed, and will take a few minutes to half an hour to complete.
This task requires little or no experience, and no or only very basic tools. A lot of cabin air filters can be accessed without any tools - often they are held in place by clips. A screwdriver or pliers may be helpful to pop off the clips or pry open the access cover, but but rarely more than that.
Replacing the passenger cabin air filter is just a matter of swapping the old for the new. It is a good practice to dust or vacuum the area where the filter sits, if you can reach it easily, to ensure there's no dirt in the area.
Discover how to replace the pollen filter on your car!
How Much Does Replacing a Cabin Air Filter Cost?
Luckily cabin air pollen filters are cheap, with the majority costing less than $10. Activated carbon filters may cost twice that - but still inexpensive for what they do.
If you regularly take your car in for service, the labor of changing the filter is often bundled with other jobs. If you do have to pay for it, you are likely to be out $50-100 for labor, for something that takes less than 30 minutes, even for a novice.
