What is primer paint when it comes to your vehicle? Primers are the most common undercoats used when refinishing car bodies. They’re used to build up and level feathered areas or rough surfaces and to provide a smooth surface for paint. Primers have several unique characteristics:
- Adhesion – they provide a strong bond between the sheet metal or old paint and the new paint
- Rust resistance – they resist the formation of rust where they adhere to the sheet metal
- ‘Build’ – they’re able to fill sanding and grinding marks in old paint, sheet metal and fillers
- Sanding ease – they can be sanded smooth and levelled quickly and easily
- ‘Hold out’ – they prevent the paint from soaking in, which results in a dull finish
- Drying speed – a good high-build primer should be ready to sand in as little as 30 minutes
The two main types of primers are: Primer lacquer (also known as 1K or 1-pack, or just Primer) and Etch primer.
Primer Lacquer
This type of primer is normally available as ‘high-build’ primer. High-build primer has three main functions:
- To provide a relatively thick coating which will fill any small imperfections (eg. minor scratches and sanding marks) in the finish underneath.
- To provide an element of stone chip resistance; if a stone penetrates the top-coat, the high-build primer has an element of elasticity to absorb the impact, preventing the chip from penetrating through to the bare substrate underneath.
- To provide a coating which can be sanded to give a smooth, sound base on to which colour coat can be sprayed.
High-build primers are usually 2-pack products which are mixed from 3 elements (primer, activator and thinner). The term ‘high-build’ is used by most paint manufacturers to refer to the primer used to prepare a surface for application of colour coat. High-build primer can be mixed with thinners in various ratios to provide coatings of various thicknesses. ‘High-build’ primer is not necessarily applied to give a thick ‘high-build’ layer, and can be sprayed to give a thin layer purely to provide a key fo colour coat.

Etch primer
The purpose of etch primers is to replicate the cataphoretic dip priming process used by vehicle manufacturers to protect panels against corrosion. Etch primers contain an acid which etches bare metal, ensuring that there is a very strong bond between the primer and the panel surface. Etch primers are normally used on bare metal, but most types are equally effective on other materials such as plastic and fibreglass (check the manufacturer’s recommendations as to suitability for non-metallic surfaces).
Etch primers can also be used on galvanised metal or on top of existing primer to cover any minor damage in the protective galvanising coating. Etch primers are usually two-component products, which contain an acid activator. The acid etches the bare metal, allowing the primer to adhere strongly to the panel, and providing excellent corrosion resistance. Some paint manufacturers also produce etch primer ‘ready-to-spray’ in an aerosol can for repairs to small areas.
Generally, etch primers do not require sanding, and 1K primer (high-build or otherwise) is usually spayed over the top before preparing the panel to receive the colour coat. Etch primers are the only primers suitable for use directly on galvanised panels.
Other common undercoat products that may be confused with primers are sealers or primer-sealers (some sealers prime as well as seal and are known as ‘primer-sealers’, while others only seal). Primer-sealers do the same job as primers, but they also seal better over a sanded old paint coat to provide uniform colour ‘hold out’ when the new paint is applied. Sealers don’t have the same characteristics as primers – they’re applied over a primer or sanded paint coat to improve adhesion between the old paint and the new paint, provide a uniform colour background and ‘hold out’ for the new paint and to form a solvent barrier to help prevent sand scratch swelling and ‘show through’.
Sealers are usually lacquer based, so they’re easy to apply and dry very fast. Primer-sealers are generally enamel based. They can be used to prime bare metal and as a sealer under any enamel paint job.
The type of sealer to use depends on the paint to be applied. Check with an automotive paint shop to be sure you match up the primer-sealer or sealer correctly with the paint you intend to use. Depending on the condition of the old paint, the type of new paint being used and the repairs that were done, sometimes a sealer must be used and sometimes a sealer should be used.
The decision to use a particular type of primer, high-build primer, primer-sealer and/or sealer depends on whether or not the car’s surface is smooth or rough, bare metal or painted, if painted, the type of paint already on it, and the type of paint you intend to apply. Paint manufacturers offer a variety of products that should be used in specific combinations for the best results, so check with your local automotive paint shop before buying primer and paint – they’ll recommend items that are compatible.
The first and most important step when applying primer is to get the body’s surface ready first. Use compressed air to remove all dust and dirt from joints and recessed areas, then wipe the entire car down with wax/silicone remover.
Next, tape and mask off all trim and glass just as you would for painting, then mix up the primer (where necessary). Always remember to check that the primer and paints you plan to use are compatible – don’t be afraid to ask advice from your local automotive paint shop.
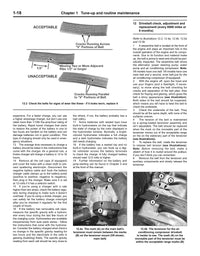
No matter what kind of paint is going to be used, use the recommended multi purpose primer with the appropriate thinner (where applicable – ask for advice at your local automotive paint store). Mix them according to the directions, then stir thoroughly. For primer, adjust the spray gun so the spray pattern is about 200 mm wide, 300 mm from the gun head.
If the pattern is too wide, there will be a thin spot in the middle; if it’s too narrow, the pattern will appear as a tight band. The fan (pattern) adjustment is the top knob above the handle on the spray gun. The second knob is for material (primer or paint) adjustment.

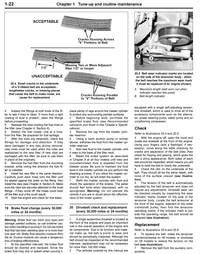
Make several practice passes on a piece of cardboard with the compressor regulator set at 60 psi (4.1 bar). Notice that when the paint gun trigger is first depressed, there’s a moment when only air comes out, quickly followed by the paint. Practice making a smooth pass, keeping the gun at a constant distance from the surface until the pass is completed.
Start the pass on one side, swing horizontally to the other limit, raise or lower the gun nearly a fan width and go back. Keep the gun nearly a fan width lower and make a second pass. The gun should be kept parallel to the surface, so one end of the fan isn’t closer than the other.
If you’re spot priming isolated repairs, overlap the primer onto the existing paint about 25 or 50 mm all the way around the sanded surface. If the entire vehicle is being primed, start with the doors, bonnet and boot lid/tailgate openings. Spray the primer on evenly, in smooth strokes. When they’re done, allow them to dry for 10 to 15 minutes, then close everything up and start on the outside metal.
Start spraying on the top, which is the hardest area to reach, and remember these hints:
- Throw the air hose over one shoulder and hold it away from the car with your other hand
- Wrap a piece of rag around the gun/cup connection point to keep paint from dribbling out when painting with the gun in a nozzle down position
- If the primer is going on correctly, it will appear smooth and wet for just a short time; if it looks grainy, the primer is too thick or you’re holding the gun too far away from the surface
- If the primer runs, it’s too thin or you’re holding the gun too close to the surface
- If the primer alternates wet dry wet or wet runny wet, your passes are inconsistent
Primer is the basic foundation of a fine paint job, so don’t skimp. It takes about 4 litres of unthinned primer for the average car, so keep going around it until you’re sure you have it covered well.
After the primer has dried for 20 or 30 minutes, the tape can be removed. Although it’s possible to go right ahead and sand the car (dry) and follow with the paint, it’s a good idea to allow the primer to cure for several days, or even a couple of weeks if possible. The primer will shrink as it dries, so allow time for it to cure completely before painting.
After the primer has cured and shrunk, use wax/silicone remover again, completely washing the car, even in the tiniest cracks. This is vital – any foreign substance will invariably ruin an otherwise perfect paint job. For instance, just the marks left by your fingers will leave dark splotches under the final colour. When washing the car with the solvent, always use clean, lint free rags.
Don’t use workshop rags, as they’re often cleaned with low-grade solvents that contain contaminants which will prevent good paint adhesion. If wax/silicone remover isn’t available, in a pinch you can use thinner, applied with a very wet rag and immediately wiped off with a dry rag. Don’t wait even a minute if you use thinner, as it’ll quickly soften the primer’s surface.