
All Haynes Digital Online Manuals are currently 50% off. They feature everything you love about our books in an instantly accessible digital online form, that you can use via any device with an internet connection.
This page is taken directly from our online manual 50030 covering all 1987-2017 Jeep Wrangler models with 4 cylinder, V6, and inline 6 cylinder engines. The chassis should be inspected and lubricated every 12 months or 7,500 miles, every 6 months of you do a lot of off-road driving. Proper application of grease and other lubricants will help avoid having to replace more expensive parts, or breaking down on the trail.
Chassis lubrication
- Refer to "Recommended lubricants and fluids" at the front of this Chapter 1 of your Haynes manual to obtain the proper recomended grease and lubricants. You will also need a grease gun (see illustration). Occasionally plugs will be installed by the factory rather than grease fittings. If so, grease fittings will have to be purchased and installed.
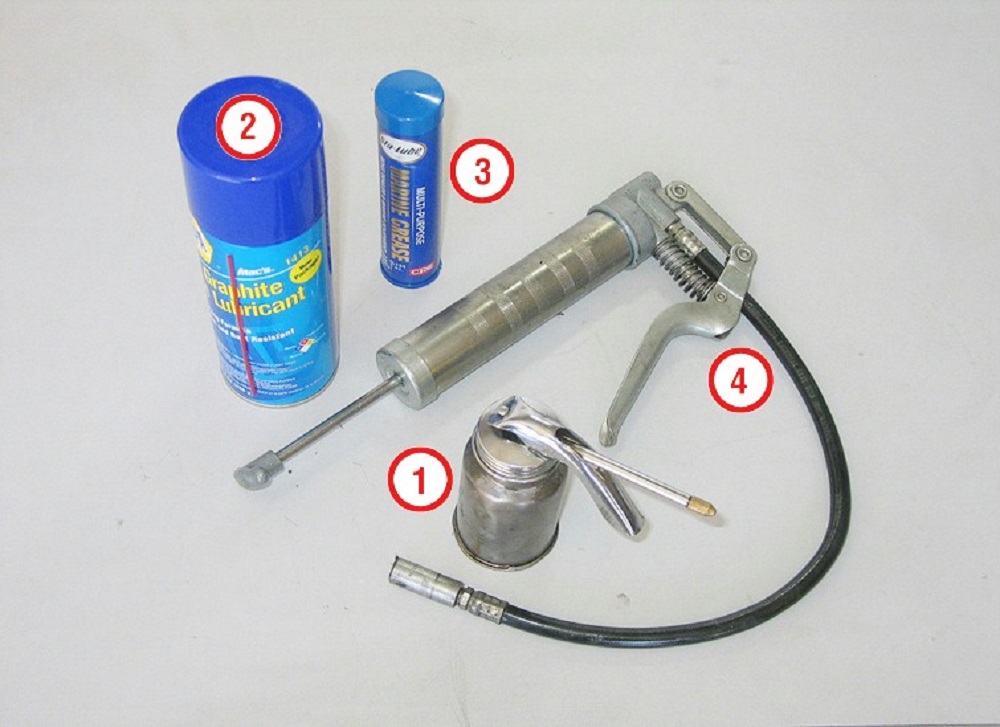
Illustration 13.1 Materials required for chassis and body lubrication
1) Engine oil - Light engine oil in a can like this can be used for door and hood hinges
2) Graphite spray - Used to lubricate lock cylinders
3) Grease - Grease, in a variety of types and weights, is available for use in a grease gun. Jeep recommends NLGI LB or GC-LB chassis grease
4) Grease gun - A common grease gun, shown here with a detachable hose and nozzle, is needed for chassis lubrication. After use, clean it thoroughly!
-
Look under the vehicle for grease fittings or plugs on the steering, suspension, and driveline components. They are normally found on the balljoints, tie-rod ends and universal joints. If there are plugs, remove them and buy grease fittings, which will thread into the component. A dealer or auto parts store will be able to supply the correct fittings. Straight, as well as angled, fittings are available.
-
For easier access under the vehicle, raise it with a jack and place jackstands under the frame. Make sure it is safely supported by the stands. If the wheels are to be removed at this interval for tire rotation or brake inspection, loosen the lug nuts slightly while the vehicle is still on the ground.
-
Before beginning, force a little grease out of the nozzle to remove any dirt from the end of the gun. Wipe the nozzle clean with a rag.
-
With the grease gun and plenty of clean rags, crawl under the vehicle and begin lubricating the components.
-
Wipe the balljoint grease fitting nipple clean and push the nozzle firmly over it. Squeeze the trigger on the grease gun to force grease into the component. The balljoints should be lubricated until the rubber seal is firm to the touch. Do not pump too much grease into the fittings as it could rupture the seal. For all other suspension and steering components, continue pumping grease into the fitting until it oozes out of the joint between the two components (see illustration). If it escapes around the grease gun nozzle, the nipple is clogged or the nozzle is not completely seated on the fitting. Resecure the gun nozzle to the fitting and try again. If necessary, replace the fitting with a new one.

Illustration 13.6 Pump grease into the steering end fittings until the boot is firm
- Wipe the excess grease from the components and the grease fitting. Repeat the procedure for the remaining fittings.
- Lubricate the transfer case shift mechanism contact surfaces with clean engine oil.
- Lubricate the driveshaft slip joint by pumping grease into the fitting until it can be seen coming out of the slip joint seal (see illustration).
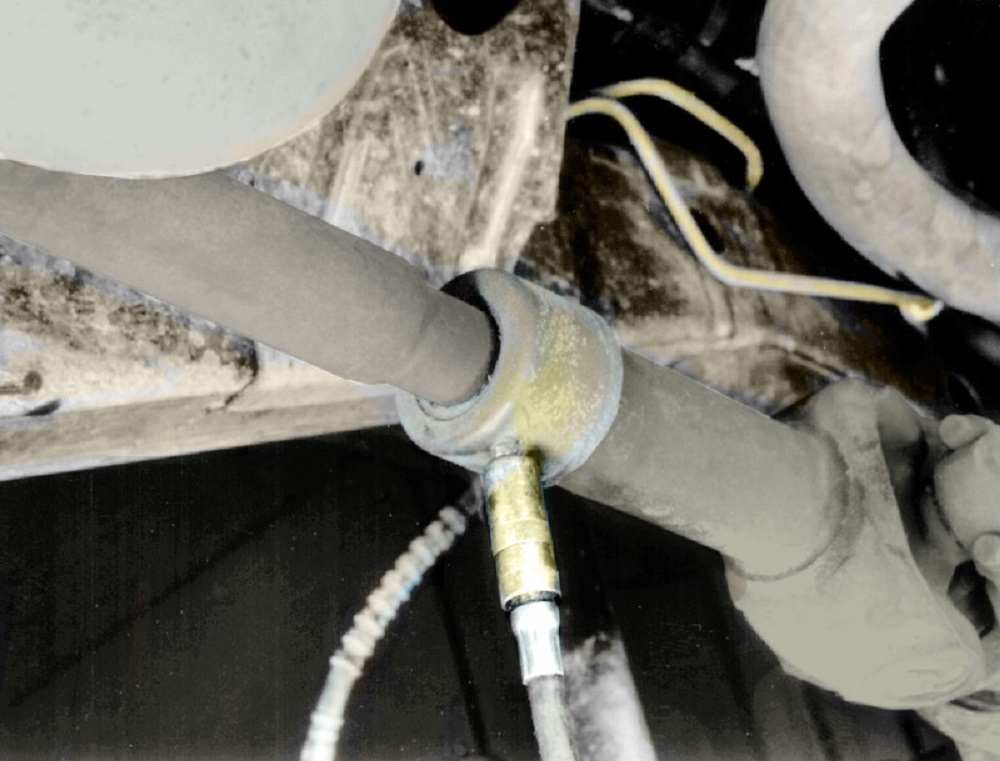
Illustration 13.9 The slip joint grease fitting is located on the collar - pump grease into it until it comes out the collar
- Lubricate conventional universal joints until grease can be seen coming out of the contact points (see illustration).
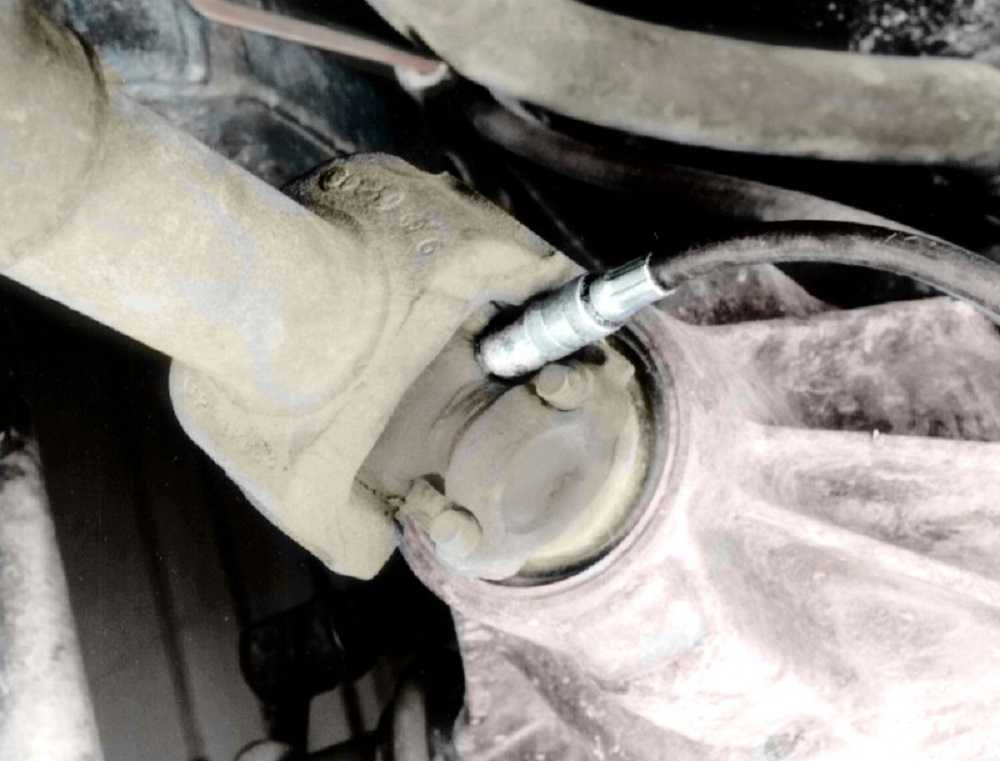
Illustration 13.10 You may have to rotate the driveshaft for access to the universal joint grease fitting - pump grease into it until grease can be seen coming out of the contact surfaces
- While you are under the vehicle, clean and lubricate the parking brake cable along with the cable guides and levers. This can be done by smearing some chassis grease onto the cable and its related parts with your fingers.
- The manual steering gear seldom requires the addition of lubricant, but if there is obvious leakage of grease at the seals, remove the plug or cover and check the lubricant level. If the level is low, add the specified lubricant.
- Lubricate the contact points on the steering knuckle and adjustment bolt.
- Open the hood and smear a little chassis grease on the hood latch mechanism. Have an assistant pull the hood release lever from inside the vehicle as you lubricate the cable at the latch.
- Lubricate all the hinges (door, hood, etc.) with engine oil to keep them in proper working order.
- The key lock cylinders can be lubricated with spray-on graphite or silicone lubricant, which is available at auto parts stores.
- Lubricate the door weatherstripping with silicone spray. This will reduce chafing and retard wear.